Ah, the touchpad. The best thing to come to laptops since the eraser mouse :). Touchpads have been around for years and have changed over time. Most notably, some touchpads no longer have dedicated left and right (mouse) buttons. However, you can still click, right-click, drag, and drop with ease using the Chromebook touchpad. You can even customize settings you make the touchpad work “your way.“
For many users, including students, the Chromebook is the first device they have used with a touchpad. You can still connect a USB mouse to the Chromebook, but the touchpad’s best feature is, that it’s always connected to the Chromebook.
Let’s take a look at some of the common tasks you will use your touchpad to do and some settings that will allow you to customize how the touchpad operates for you and only you. Plus, these same settings will follow your account from Chromebook to Chromebook.
Change Your Touchpad Scroll Direction
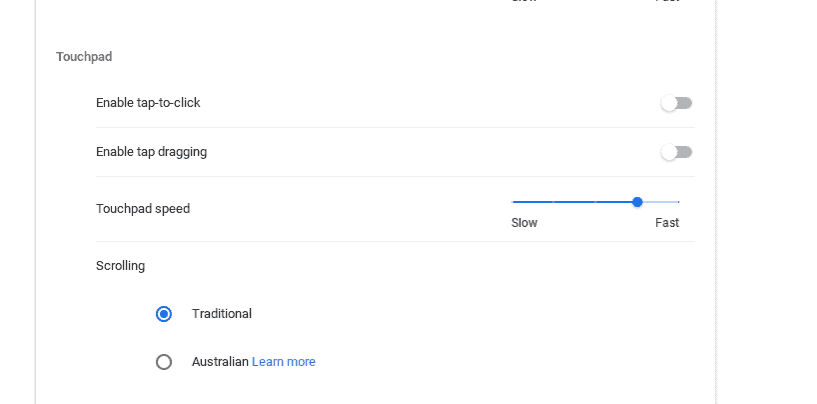
By default, when you slide your fingers down on the touchpad, the page scrolls down. Sliding up scrolls up. Some users prefer the opposite to happen. No problem, scrolling directions can be changed in Chrome OS settings.
To Open Touchpad Settings
- Click the Chromebook App Launcher icon (Chromebook Start button)
- Type Settings
- Click Settings
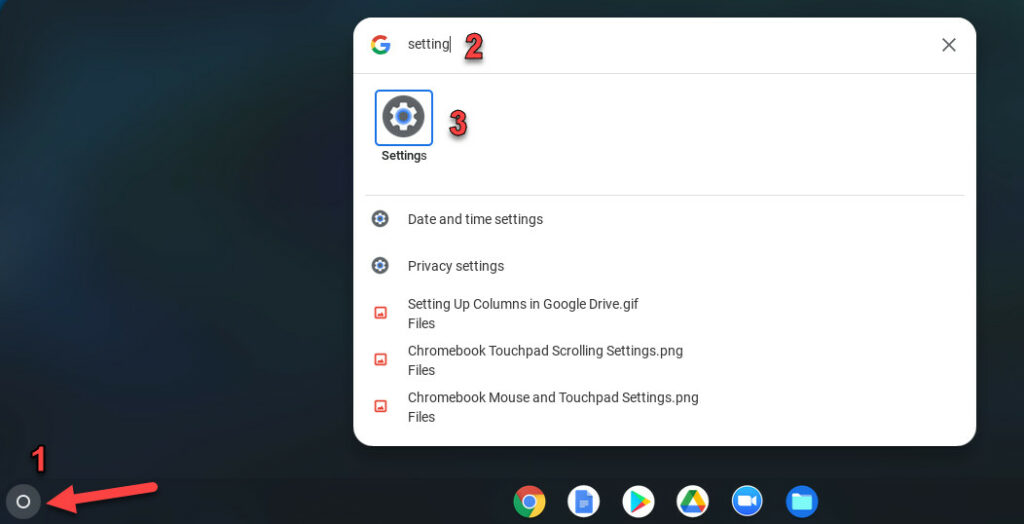
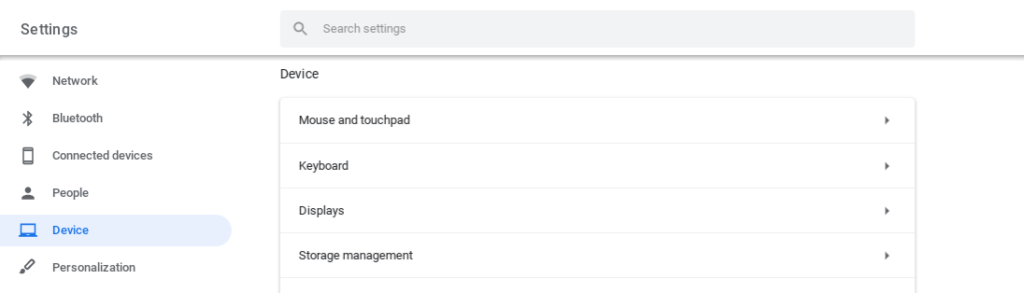
- Click Devices
- Click Mouse and touchpad
- Change Scrolling from Traditional to Australian
Easy Way To Right Click Using A Chromebook Touchpad
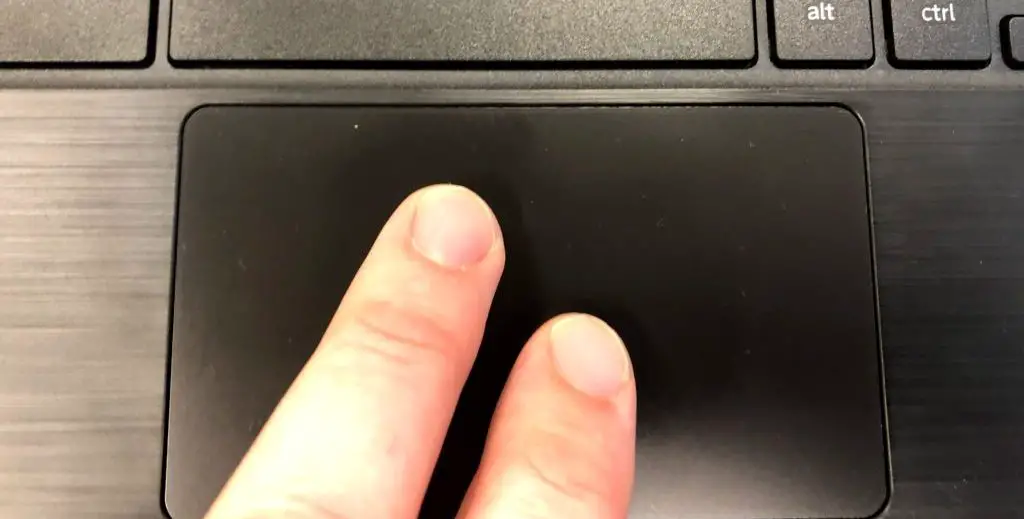
Right-clicking is like wiggling your toes, we all take for granted being able to do it until we can’t. You CAN right-click using a Chromebook touchpad and it’s easy to do.
Instead of pushing down (clicking) with one finger on the touchpad, use two fingers at the same time.
How To Scroll Using a Touchpad
Most of us remember clicking and dragging on a scrollbar on the right side of a website, documents, etc… This way still works, but have you noticed the scroll bar isn’t visible on all websites? Don’t worry, you can scroll with the touchpad.
Like you did to right-click, use two fingers, but slide your fingers up and down instead of pushing down on the trackpad. Go ahead and try it out on this web page.
How To Turn Off Tap to Click on Chromebook Touchpad
I often find when I type that my thumbs graze the touchpad. The Chromebook usually treats this as a “click” that moves my cursor or causes other issues. One way would be to invest in some thumb covers. Another option is to adjust your Chromebook touchpad settings.

Changing this setting only affects the logged-on user’s account. You only have to change this setting on one Chromebook. Afterward, the setting will be applied to every Chromebook you log on to. Again, just for your account.
To Disable Touchpad Tap-To-Click
- Open Settings as we did earlier.
- Slide off Enable tap-to-click.
Changing the Touchpad settings has made a huge difference for me. I also love the fact that I don’t have to redo the setting on every Chromebook I use. However, I do like the finger puppet option too 🙂
Swap Between Tabs Using a Chromebook Touchpad
You probably have several tabs open in your Chrome browser right now. Tabs allow us to have several websites open at the same time. There are a few different ways to swap between them.
- You can click on each tab using your (mouse) pointer.
- You can swap between them using the keyboard by holding down the Ctrl key and then pressing the Tab key to switch between tabs
- You can perform a 3 finger gesture on your Chromebook touchpad.
The keyboard trick might have been a bonus tip for you, but since this post is all about the Chromebook touchpad, let’s take a look at the 3 finger gesture.

Place 3 fingers on the touchpad. Swipe left to move to the tab to the left of the current Chrome tab. Swipe right to move to the tab to the left of the current Chrome tab.
Use Chromebook Touchpad To Switch Between Open Apps
Just like you probably have multiple Chrome browser tabs open, you likely have multiple windows or apps open on your Chromebook. The windows you have open show up on your Shelf (taskbar) at the bottom of the screen with a line under them. Just like with swapping between tabs in Chrome, there are multiple ways to swap between windows.
- Click on each window/app on Your Shelf (Chromebook taskbar)
- Use the keyboard by holding down the Alt key and repeatedly pressing the Tab key
- Perform a 3 finger gesture on your Chromebook touchpad.
To show all your open windows on your Chromebook using a touchpad gesture, you again will place 3 fingers on the touchpad. This time, slide your fingers down.
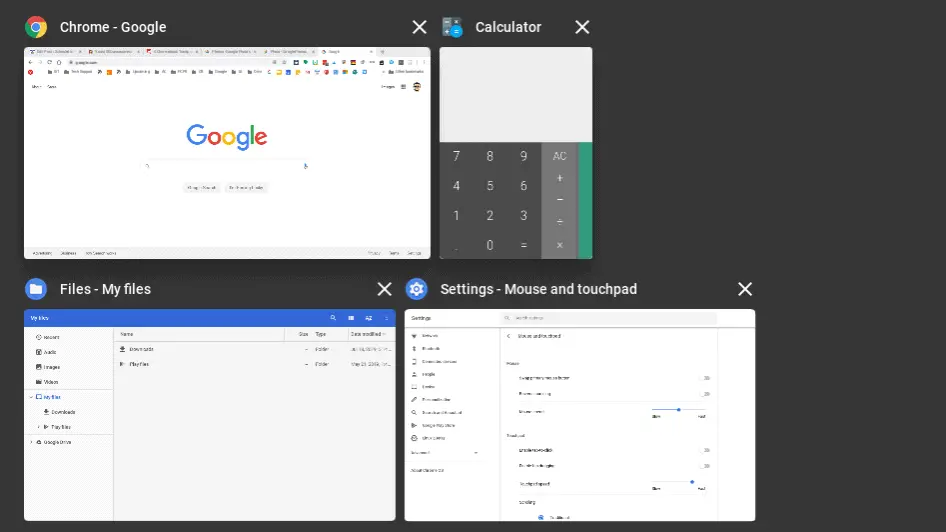
In the screenshot above you can see I have 4 windows open. I can make any of them to the foreground by moving the (mouse) pointer to one a pressing or tapping on the touchpad.
How To Disable Your Chromebook Touchpad
Some users do not like using the touchpad. Earlier I said you can connect a wired or wireless mouse to a Chromebook. Even with a mouse connected, your touchpad will still work which may cause a problem for some. One option is to turn off tap-to-click which I explained earlier. Another option is to turn off the touchpad completely.
To Turn off Your Chromebook’s Touchpad:
- Open the Chrome browser on your Chromebook
- Enter chrome://flags/#ash-debug-shortcuts into the URL bar at the top.
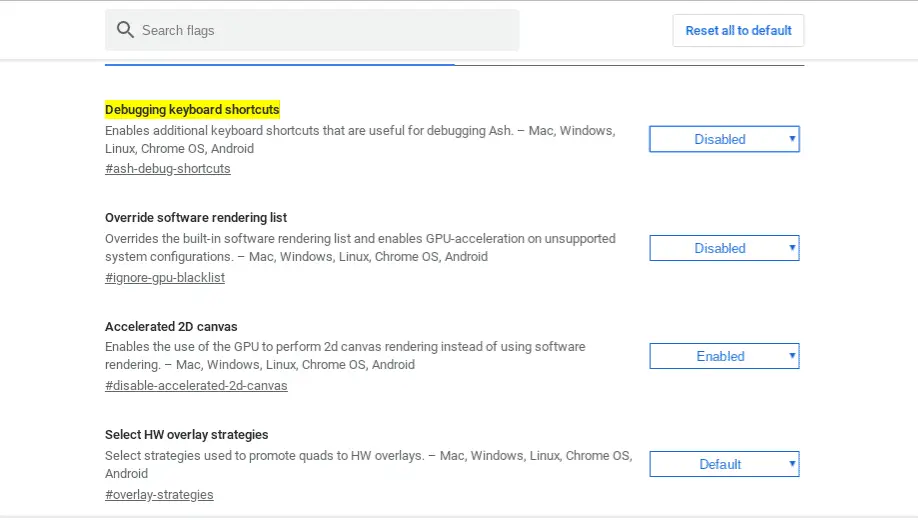
- Change Debugging keyboard shortcuts from Disabled to Enabled
- You will be prompted to restart. Go ahead and reboot.
- Once you are logged back on the Chromebook, press the Search key + Shift + P
Your touchpad should be completely disabled. However, your connected mouse will still work. To enable the Touchpad, press the same key combination again.
I hope you found these tips helpful. It might make a big difference for some of your teachers and students.